Let's start with the cover, which features several ribbon techniques before we even open the album.
- I've tied 3 ribbons strips to each of the binder rings holding the album together.
- I've pleated a curved row of ribbon and actually stitched it on using my sewing machine.
- I've tied a sprig of ribbon and attached it to the top, right corner with Liquid Tombow.
- I've pinched a short piece of ribbon in the middle and tied it with Baker's Twine.
- I've added a little tag of ribbon sticking out from under the album label.

Page 1 ---
Left:
Wrap a piece of ribbon completely around your project layer. Take a second piece and form it into a 'bow' in your hand. It's just a loop, tied in the middle. Tie Baker's Twine around your 'bow' and then around the first ribbon piece to hold it in place.
Right:
Make a ribbon accent, using a 'sprig' of ribbon that is attached with Liquid Tombow. This is like the 'sprig' on the cover of the album. This time, instead of doing a v-cut on the ribbon ends, I angle cut them. It's a good look and also helps with control of fraying.

Left:
Wrap a piece of ribbon completely around your project layer. Add a button accent. Super simple. Super cute. You could add a bow of Baker's Twine on top of the button. We were focusing on the ribbon.
Right:
Slip a piece of ribbon through the slit opening at the top of the tag. Do not tie it at all. Tie a piece of Baker's Twine around the ribbon, close to the tag, to hold it together.

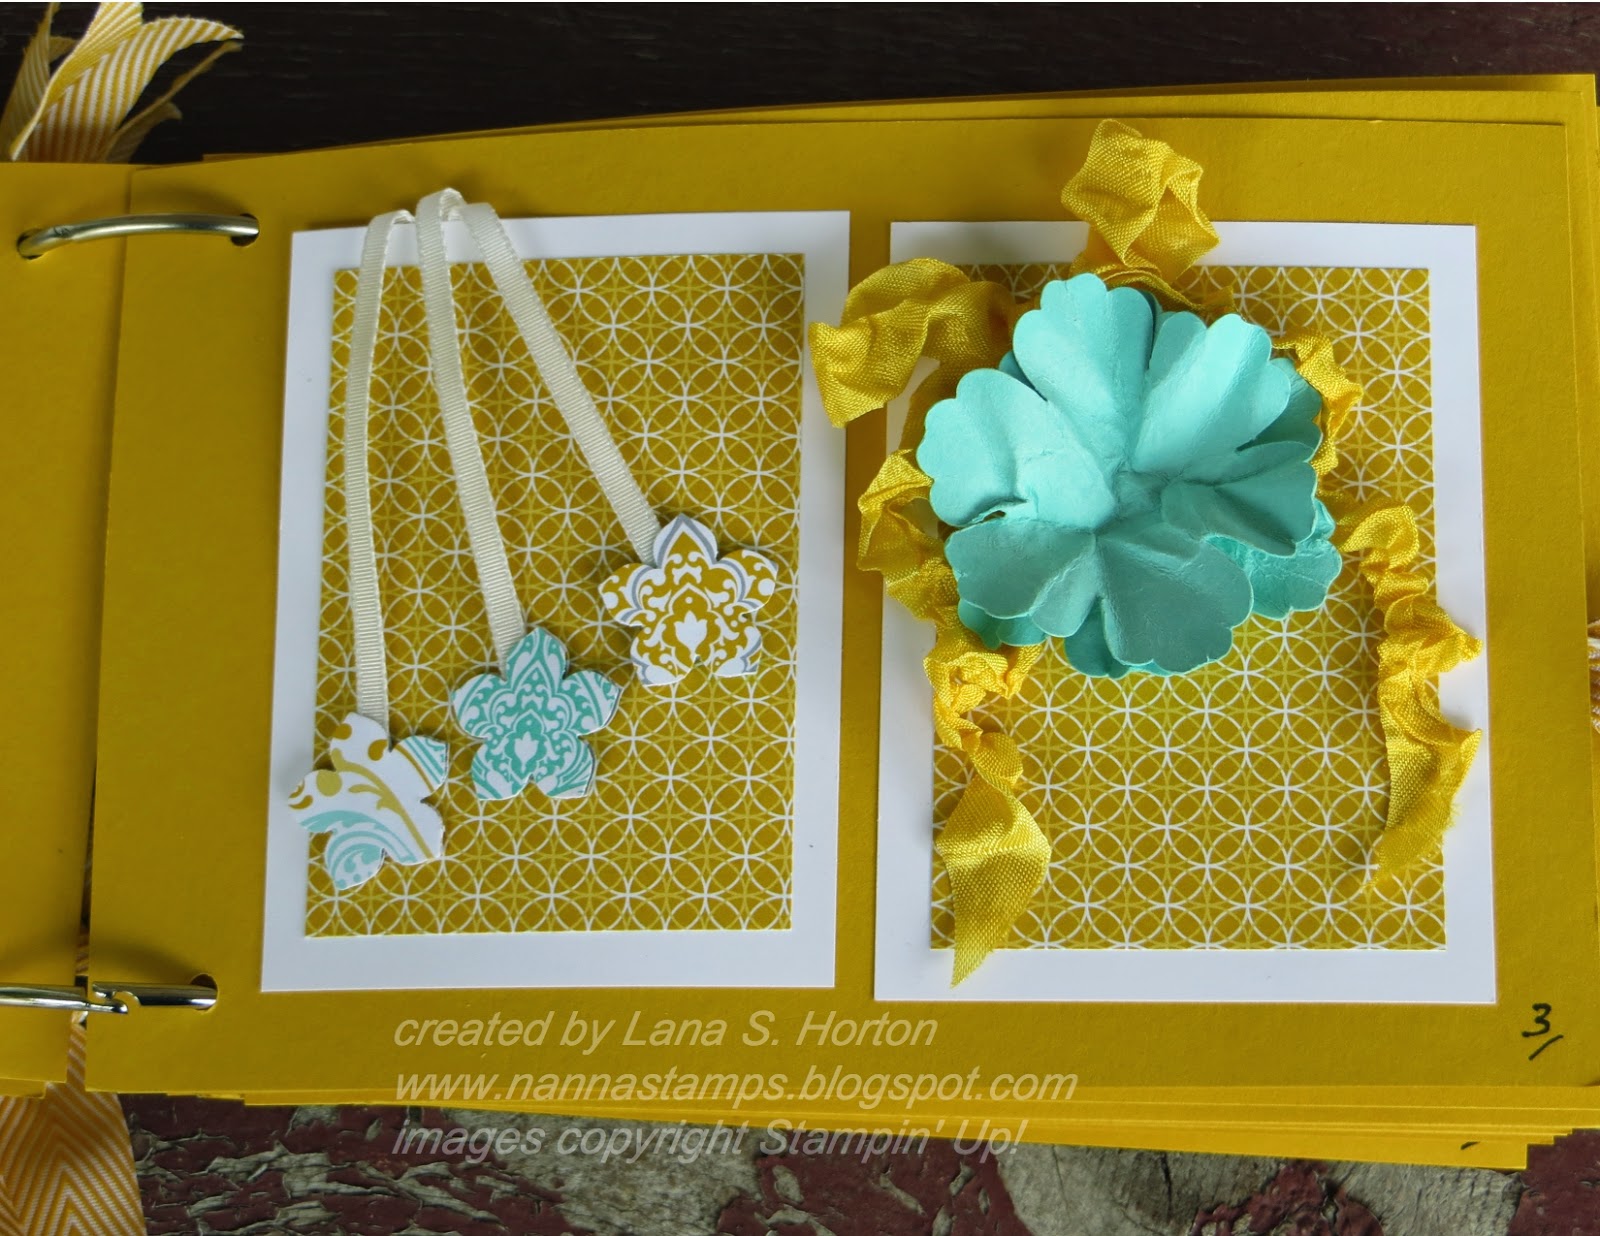
Left:
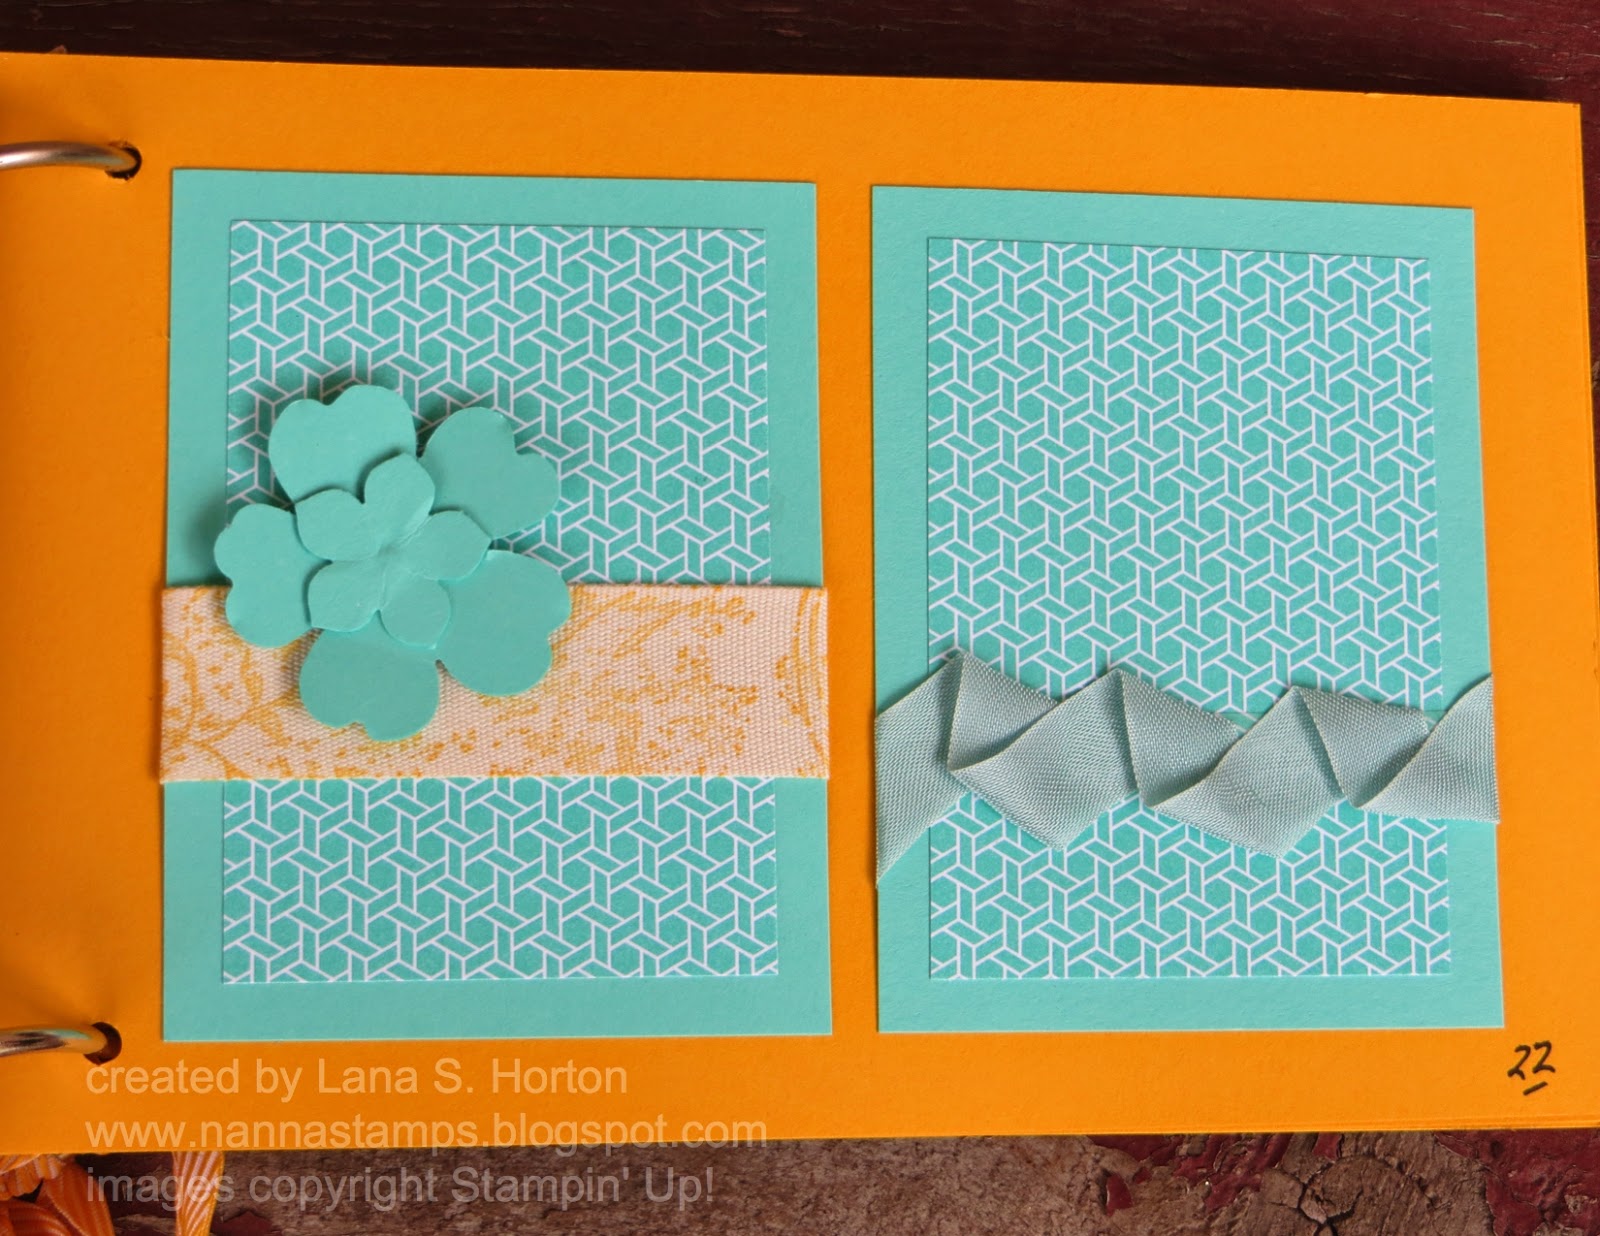
Let 3 pieces of skinny ribbon hang over the edge of your project, securing them in the back. Add punched pieces to encase the bottom ends of the ribbons. Because these are in an album, I secured the ends of the punched flowers in place on the page, so they would stay secure in the album, even with lots of page turning. On a card, you could choose to leave them loose. This technique looks nice with little punched stars, as well.
Right:
Cut a long piece of seam binding ribbon. Ball it up in the palm of your hand and spritz it lightly with water, while still holding it in your hand. Relax it, roll it tighter again and keep repeating this process several times. Set aside to dry, while still crumpled tightly. Check it from time to time, adding more 'crumples' in places that may still need it. This is a good vintage look.
Left:
Tuck 2 short pieces of ribbon (angle cut ends) together under the edge of a button or stamped piece, for an embellishment.
Right:
Wrap a piece of ribbon completely around the top layer of your project, letting the ends extend together on one side. Tie the ribbon pieces together, close to the project, with Baker's Twine and v-cut the ends of the ribbon.

Left:
Use a piece of ribbon to hold closed a card or folded element of a card or project. Just wrap it around the 2 layers you wish to hold together and tie it off.
Right:
Loop a piece of ribbon and then push one side up into a second loop/pleat. Hold together by wrapping the prongs of a brad around the ribbon. (Pinch the ribbon in where you're going to attach the brad.) Place Liquid Tombow on the ribbon around the brad area on the back to attach the piece to your project.

Left:
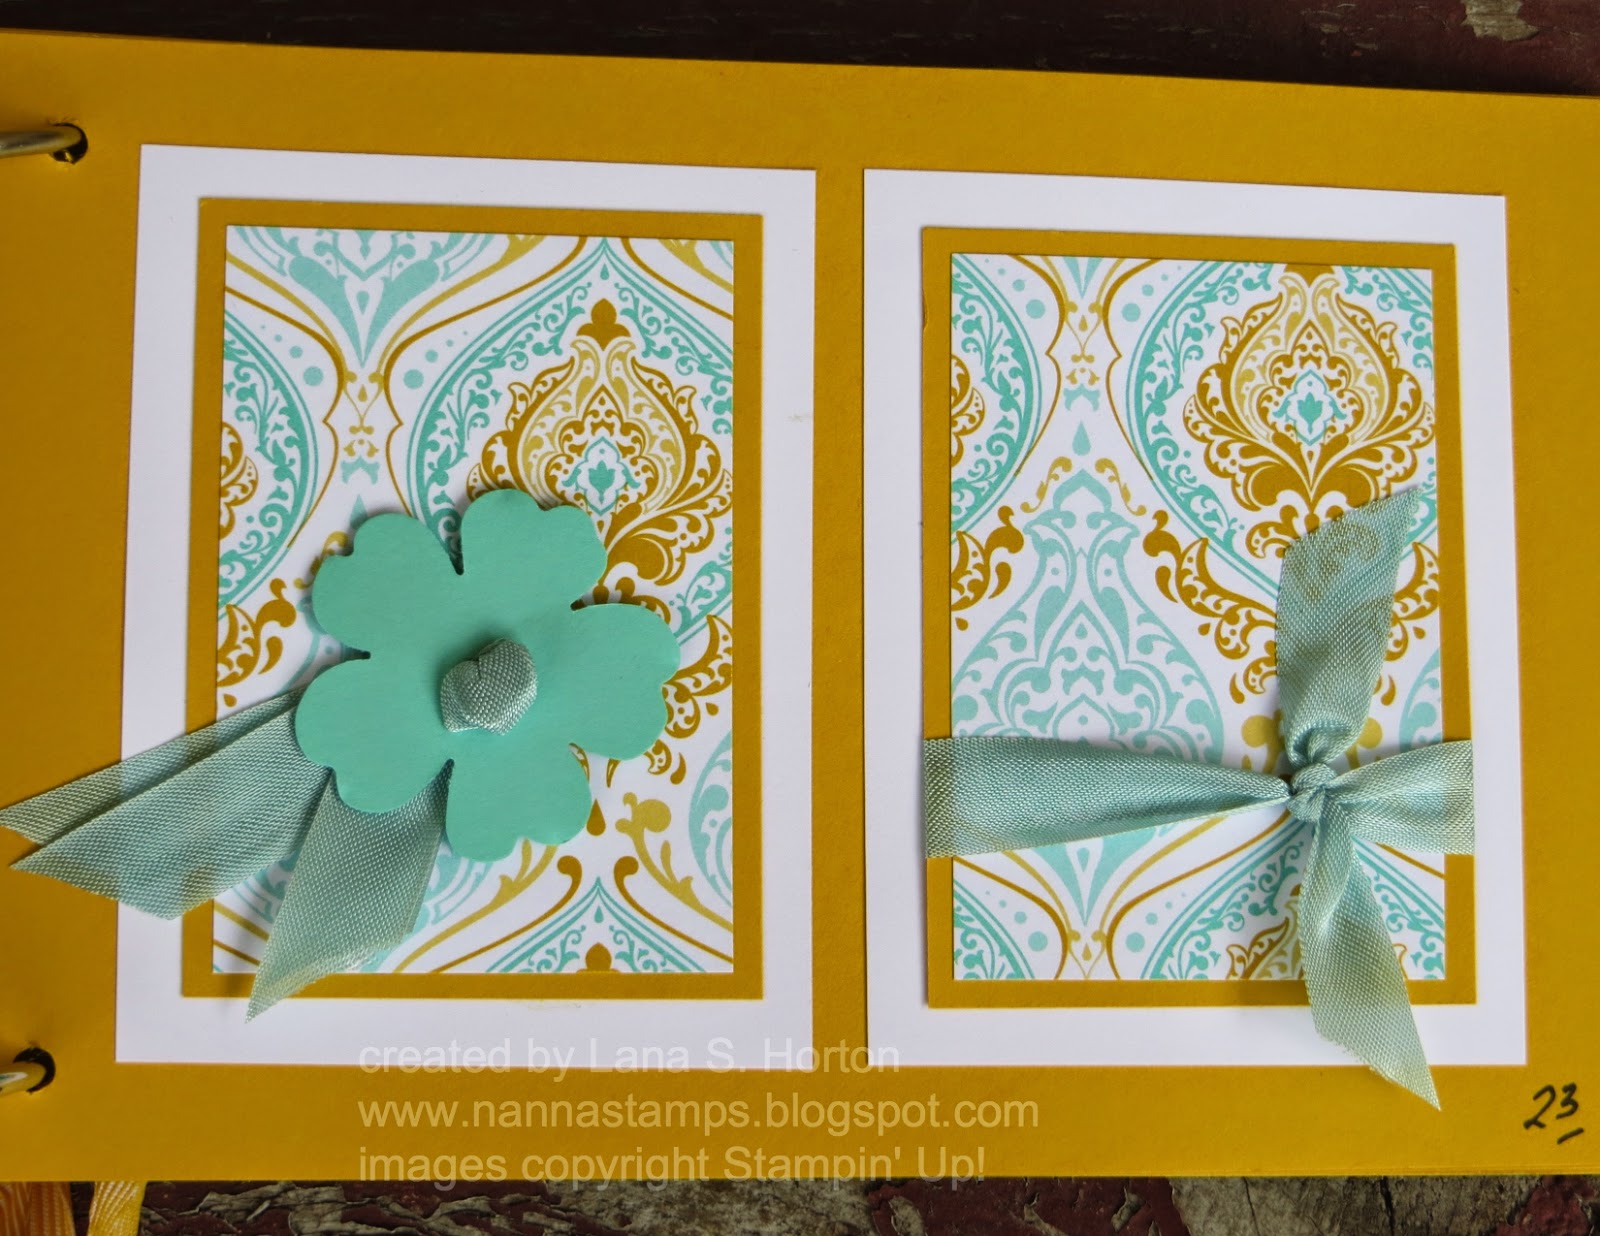
Tie a knot into the middle of a sprig of ribbon. Angle cut or v-cut the ends. Attach to your project with Liquid Tombow.
Right:
Stack 2 pieces of ribbon and tie them together using a 3rd piece of ribbon. Attach to your project with Liquid Tombow. Notice that I've used 3 different sizes of ribbon for mine. It makes a nice look.

Left:
Lay 2 different pieces of ribbon together. Loop them and tie into a knot. Attach to your project by applying Liquid Tombow to the knot.
Right:
Punch a small hole in the top, left corner of your project. Thread a ribbon through the hole and tie it over the hole. This is a fun and easy way to add a ribbon accent.
Left:
This is a good technique for using up tiny ribbon scraps. Just v-cut the ends of a little piece of ribbon and slip it under one of your project layers.
Right:
Wrap ribbon around your project, attaching additional layers over the ribbon.

Left:
Wrap a ribbon entirely around your project, bringing a longer end up and over the top. V-cut this end.
Right:
Attach a v-cut piece of ribbon, like a 'flag' piece to your project. Wrap the top end over the edge and attach on the back of your project.

Left:
Simply tie the ribbon around your project and showcase the beautiful ribbon. Angle cut the ends.
Right:
Wrap the left-hand side of the ribbon piece around your project and attach to the back. Pinch in a part of the ribbon, with Baker's Twine, as you attach a button to the ribbon. Leave the v-cut end loose.

Left:
Fold over a piece of ribbon, in a loop. Tie, as shown, using Baker's Twine, and attach to your project.
Right:
This is a good technique for using 1, 2, or 3 pieces or ribbons. Tie several knots into the ribbon and then simply attach the ribbon around your project.
Left:
Lay a line of Sticky Strip across the entire width of your project. Gently push ribbon into soft pleats along the Sticky Strip, wrapping the end of the ribbon around to the back of your project. Add glue dots under each pleat to help keep the pleats in place. Optional: Add a little flag piece or other embellishment over part of the ribbon, as shown in my sample.
Right:
Loop 2 pieces of ribbon together (different colors and/or textures) and hold together with the prongs of a brad. Gently pull the looped part of the ribbons apart so you can see both. The ends are all angle cut in the same direction.

Left:
Baker's Twine makes an easy accent on any project. Wrap around your project and tie (at center or slightly off-center) Pull the sides apart, so you can see all the layers. This look works well with Linen Thread, also.
Right:
This technique works well with skinny ribbon, linen thread and/or Baker's Twine. Before wrapping the ribbon around your project, punch 2 small 1/2 circles - one on each side. Wrap the ribbon or twine around the project, letting the indentations help hold it in place.

Left:
Cut 2 short pieces of ribbons, contrasting colors, and tie them together. Attach the knot with Liquid Tombow. This is like the knotted 'sprig' on my album cover and on page 6 (left side) but with double ribbons. Angle cut the ends of the ribbons, keeping the ribbon ends in the back slightly longer.
Right:
Show off an embellishment, such as a cute clip, by tying a short piece of ribbon around it. Angle cut the ends of the ribbons.

Left:
This technique is a variation of 2 previous techniques - combined. Tie a ribbon around your project. Before making the final tie, add in 2 looped pieces of ribbon and secure them in with the first tied ribbon. This makes a beautiful, soft look for your project.
Right:
This is a fun and easy technique. Punch 2 holes, fairly close together, at the center of your project. Take a length of ribbon and thread each end straight down through the holes, from the front of the project. In the back, cross the ribbon ends over to the opposite hole and come up through it to the front. This makes a bow look to your project. V-cut the ribbon ends.
NOTE:
Since this technique actually will hold the layers of your project together, it is a good technique for adding vellum to a project (no adhesive to show).
TIP:
To get ribbon ends to go through tiny holes, cut the ends at a very sharp angle. Leave enough extra ribbon that you can cut again if it starts to fray too much before you're finished.

Left:
This is a super simple technique that just adds a fun touch to your project. Take a length of ribbon, tie a knot in it and then wrap it around your project. This technique works well with a skinnier ribbon.
Right:
Another super simple technique involves a twist. Take a length of ribbon, twist it once and then wrap it around your project. This technique works well with wider ribbons.

Left:
I love adding little banners to my project. This banner uses v-cut ribbon pieces and DSP. They are all attached to a line of Baker's Twine and then secured to the project. Add a little bow of Baker's Twine on each end by attaching with balled up glue dots.
Right:
This technique is pretty much the same as on page 15, left side. It's wrapped horizontally instead of vertically and I've used different ribbons, to show how much this can change the look of your project. Wrap a ribbon around your project. Before you tie it for the last time, add in a couple sprigs of looped ribbon. This example shows a bolder contrast, where as my page 15 sample shows a softer look.

Left:
This is a super easy technique that works well with any ribbon, but I think it looks especially nice with a wider ribbon. Simply wrap the ribbon around your project and secure in the back. Pinch off a little piece of the ribbon (off-center looks best) and tie with Baker's Twine.
Right:
This one is a bit of a fooler and it's even easier than it looks because it's TWO pieces of ribbon. Wrap a piece of ribbon around your project and secure to the back. Take a shorter piece of ribbon and tie it around the first ribbon. That's it... just that simple.

Left:
This one couldn't be any easier. The ribbon is just tied through 2 punched holes. It has an important purpose though, as it serves to hold the vellum layer to the layer behind it. Now, you don't need adhesive, which would show behind the vellum and look pretty awful.
Right:
This technique uses ribbon as an additional layer on your project. Attach rows of ribbon to form a solid layer that shows through a punched opening in your project. Because it becomes bulkier than a flat layer, I've attached this layer with Stampin' Dimensionals. I've also added a sprig of ribbon (at the top, left of the project) to accent the ribbon layer and tie it all together.

Left:
This is one of my most favorite ribbon techniques ever! It's called a Levi tag... like the Levi tag on a jeans pocket. You can attach it to the back or get sassy with a staple. It's a great way to use up little scraps of ribbon.
Right:
This project features a way to attach vellum and use ribbon as an accent for it. Remember, you don't want adhesive to show through when using vellum. Cut your vellum piece at least 1/4" wider on each side, score it and fold it around to the back of your project. Attach it to the back. The ribbon also wraps around the project and is attached in the back.
TIP:
You can always add a layer of adhesive to attach vellum and then hide the adhesive by adding ribbon over it.
Left:
This technique uses a tiny scrap of ribbon as an additional accent on your project. V-cut both ends. Lay down a line of adhesive and then press the ribbon into it to secure it.
Right:
Another way to use a small ribbon as an accent is to make it into a 'flag' piece on your project. Wrap it up and over the edge of your project and attach it in the back.

Left:
This technique shows how you can stamp on ribbon. I've simply wrapped the ribbon around the project and attached it to the back, after stamping my design. You can experiment with different colors of ink to see which ones you like the best for the look of your project.
Right:
This is similar to the pleated technique on page 12 (left side), but perhaps even easier. It's a zig-zag. Lay down a line of Sticky Strip on your project. Take your ribbon and attach it in a zig-zag pattern across the Sticky Strip, leaving both ends longer. Wrap the ends around to the back and attach onto the back. Add glue dots under the 'folded' parts of the ribbon to help secure it.
Left:
This is a clever little technique to do with a ribbon. Loop a longer piece of ribbon and tie a knot fairly close to the looped end. Feed the knot up through a small hole in the flower. Attach the ends to the back of the flower and then angle cut them to come out from the flower.
Right:
I've ended my album by simply showing how you can tie a ribbon around just part of the layers of your project. It's a nice look and, of course, super simple.
I
truly hope you've enjoyed seeing all my ribbon techniques. Please do
me the honor of leaving a comment about them ... question, suggestion...
whatever. I value your feedback. Remember, I've used different
styles, sizes, textures and colors of ribbons for each of the
techniques. Some of them you can vary and some of them... not so much.
Experiment and see what works best for you.

No comments:
Post a Comment